Last Updated on December 5, 2024
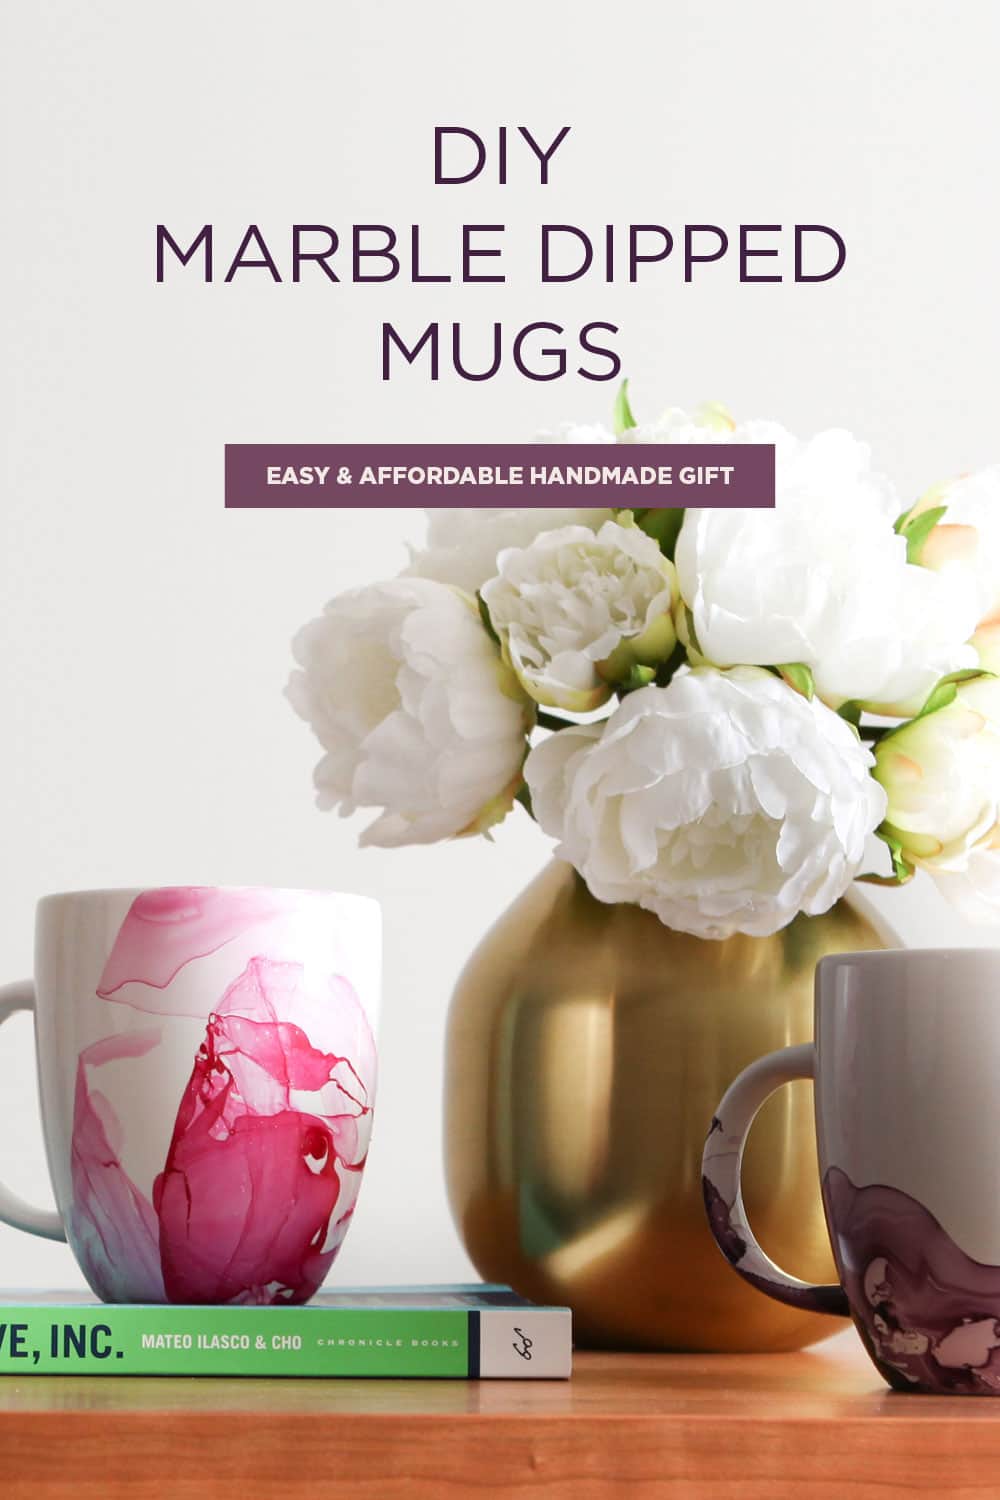
Have you heard about the simple DIY where you dip a coffee mug in nail polish? Pinterest inspired me to create these beautiful marbled mugs, and it’s the easiest craft project ever. Below, you’ll find instructions on how to DIY coffee mugs with a simple marbling technique using water and nail polish, but keep in mind that you can marble anything from plated to bowls to vases and more! Skies the limit!
Table of Contents
Learn How To Make These Colorful Marble Dipped Mugs
This DIY marble mug tutorial has been featured on Pioneer Women and shared multiple times. Since this affordable, simple craft is an oldie but a goodie, I’ve watched readers transform these beautiful watercolored mugs into the perfect handmade gift — think Teacher Appreciation Day, Valentine’s Day, and easy holiday gift ideas. Just dip your plain white mug in colorful nail polish and fill it with your favorite treat or gift card! Let’s get into it.
Supplies Needed To Create Colorful Marbled Mugs
Plain white mugs
1-2 nail polish bottles (use old nail polish if you have it on hand)
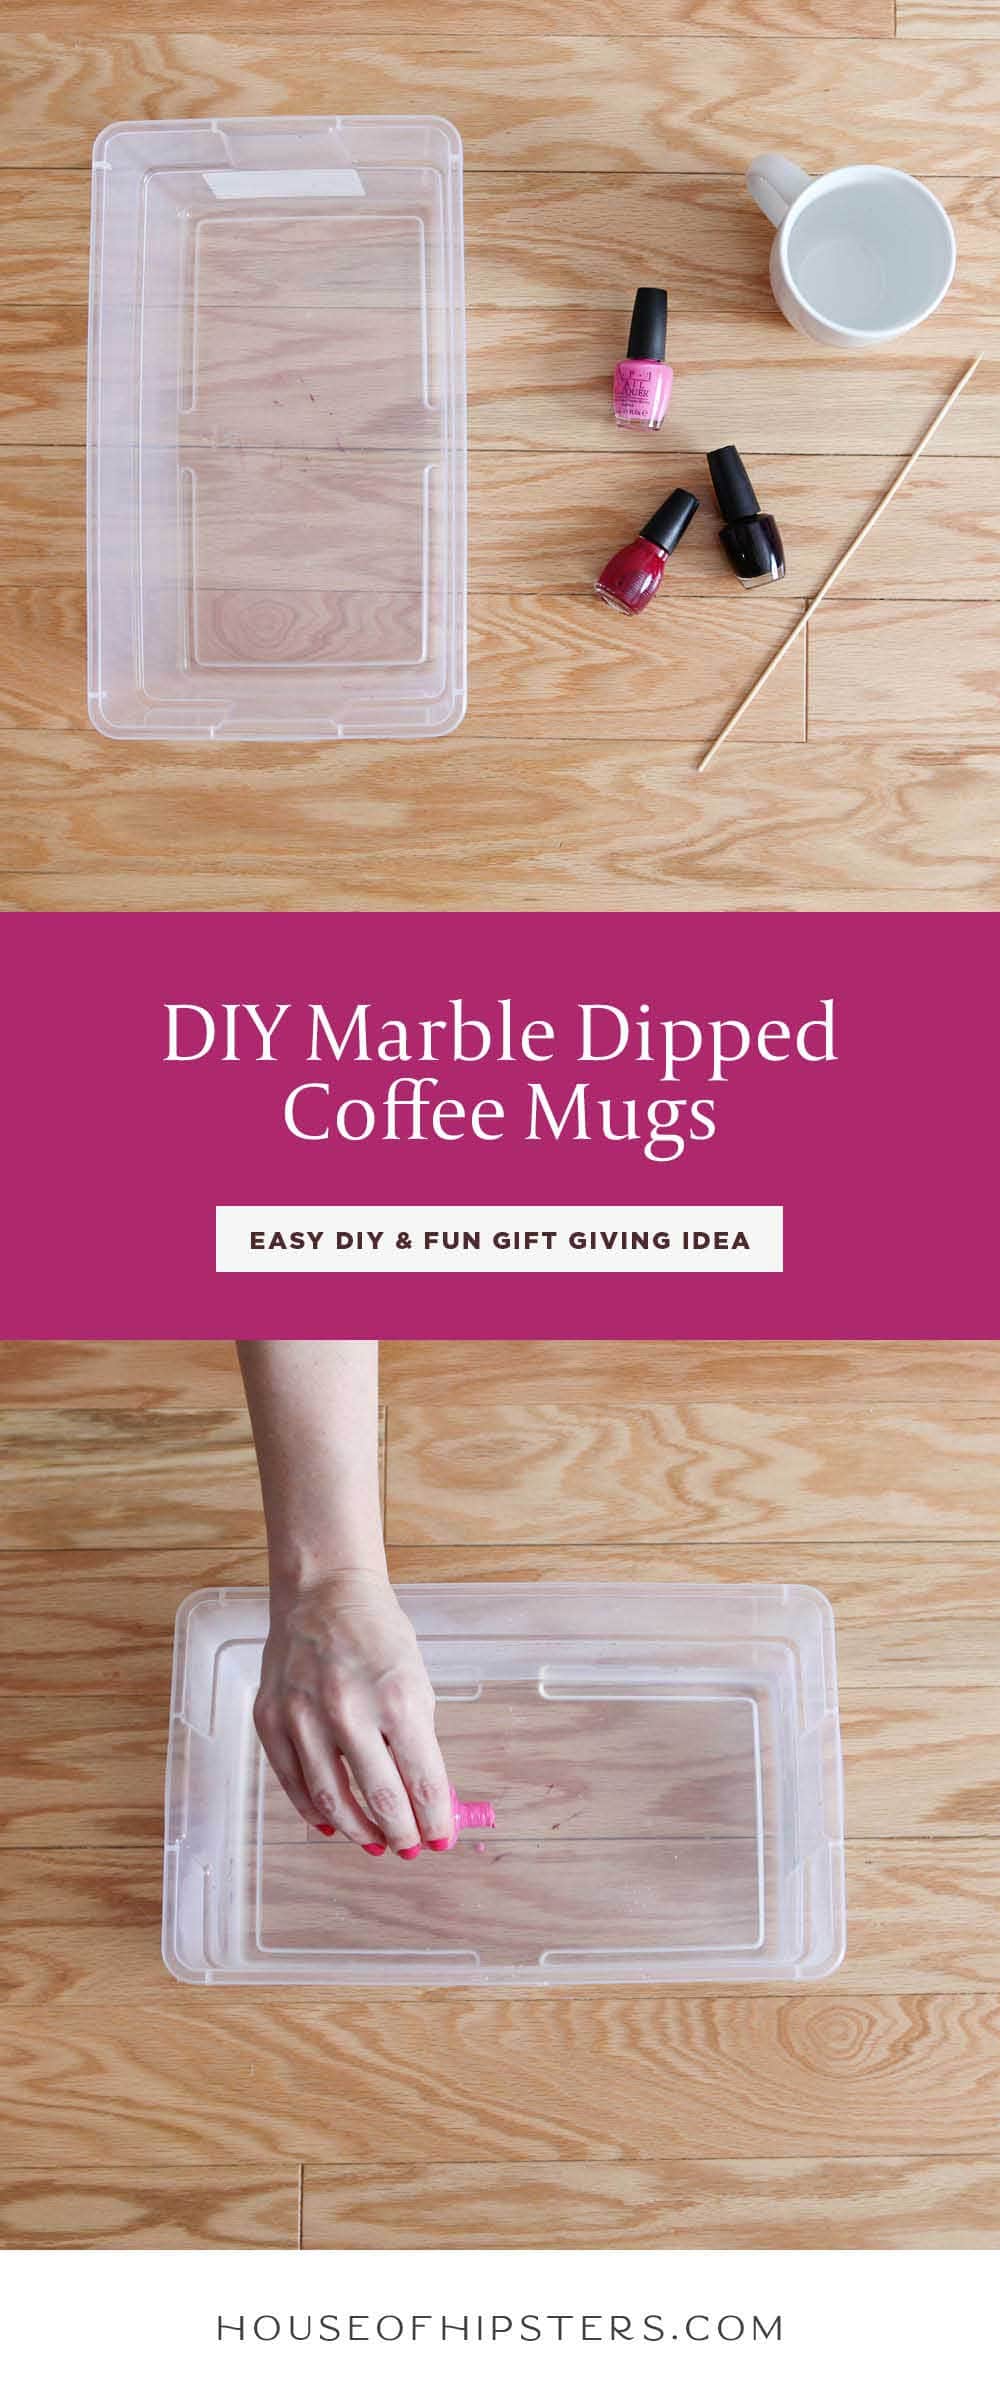
Disposable container (you don’t mind ruining)
Bamboo skewer (toothpicks work as well)
Paper towel (or parchment paper)
Instructions On How To DIY Marble Mugs
1. For Best Results, Start With Warm Water
Fill a container with warm water…the warmer the better, but not boiling hot water. No one needs to burn their fingers. Be sure the disposable container is one you don’t mind ruining since the water marbling process can leave some nail polish residue behind. Also, when you fill the container, don’t fill it up to the top. You only need enough water to hit the surface area of the whole mug.
2. Select The Nail Polish Colors
Grab some pretty nail polish colors from your bathroom, or buy some cheap nail polish. You only need a few drops of each color to make a small swirl on your ceramic mug. A little bit goes a long way.
Do not grab a quick dry polish. Time is of the essence here, and we don’t need to shorten our time even more. Also, don’t grab a color like Essie “Ballet Slippers.” You want a color with a punch. Any polish that is bright or dark in color works well.
3. Pouring The Nail Polish
Grab your nail polish bottle and pour a few drops into the bowl of water. Swirl the polish at the top of the water surface with a skewer for a better marbled effect. A film will quickly form (yup, that nail polish is already starting to dry). If you’re using two colors of polish, add both to the water now.
You only dip your mug once. There is no second dip. Grab your first mug because we’re ready to go!

4. Dipping Your Mug
Dip the mug and twirl your wrist to pick up the paint. Place your mug upside down on a paper towel or parchment paper to dry. DO NOT TOUCH until the nail polish is completely dry.
5. Let Your Nail Polish Mugs Dry
That is all you’ve got to do! How cool, huh? I think they look like someone painted them with watercolors. Don’t you think?
If you’re marbling a second mug, skim the remaining nail polish from the water’s surface. Fresh polish drops are the best way to ensure the perfect marbling effect.
FAQs and Simple Tips On How To Create These Marbled Mugs
- Pour the polish close to the surface of the water. If dropped too high, it will sink to the bottom and not dissipate for the marble effect.
- Use a throwaway paper cup first to get the hang of it. Practice makes perfect.
- Use 2 colors of nail polish for a beautiful marbling effect.
- Don’t use the nail polish brush to add the drops. Pour the nail polish straight from the bottle.
- Your marbled mug is no longer dishwasher safe, nor is it microwave safe. And if possible, don’t put the polish on an area where you would have food or place your lips. It’s just not healthy.
- However, few readers have covered their coffee mugs in dishwasher safe Mod Podge. I’ll let you decide. Mine are only for hand washing and display—no hot chocolate in a pretty mug for me. Oh, and if you decide to wash your nail polish marbled mugs, put them on the top rack of your dishwasher.
- Only dip your mug only once if you feel like it needs more. If all else fails, let the first coat of polish dry completely and dip the mug again until you get the desired marble effect.
- This process moves very quickly, so don’t dilly-dally when dipping your coffee mugs!
- Imma say it again. Do not touch that nail polish mug until the paint is dry.
- When emptying the used water, scoop out all the extra polish with a paper towel first, or you will have a very colorful marble dipped sink.
- If the bottom of the mug is covered in polish, clean it with nail polish remover.
Shazam! That’s it! That’s the easiest way to create nail polish dipped mugs! They make for a great inexpensive gift for Christmas, fill them with chocolates or use them to hold a gift card for Teacher Appreciation Day!
Discover More Easy DIYs And Weekend Home Projects
Learn how to install a ceiling medallion to elevate your lighting decor.
Beginner Cricut projects! Get the free download to create this easy graphic kitchen towel.
Every holiday, this easy way to make a bow with ribbon tutorial goes bonkers.
I tried my hand at creating this easy dreamcatcher DIY. I love how it turned out.
Got a candle with an ugly label, but it smells amazing? Elevate your candles with this easy DIY candle packaging printable.
Industrial is in. See how to build a pipe shelf for your home office.
laura irion
wow, what a cool effect. you’ve got me looking at every ceramic piece in my house to see which one should be a victim. i’d love to try using this to make something pretty for my bookshelves!
kyla
laura irionVictimize…you crack me up! And OMG, I can’t believe how pretty these turned out!
kyla
Thanks Ursula and thanks for stopping by!
kyla
Awe, thank you Michelle! And thanks for stopping by my little nook on the internet!
kyla
Thanks Rachel and thank you so much for stopping by!
Rebecka
do you think if you bake the mugs? like the sharpie-written mugs? that the nail polish will stick and be safer for sink washing and for drinking? you should try it and let us know!
Jess
RebeckaI know someone who did this and baked them at 350 for 30 minutes, it makes them microwave and dishwasher safe
Nicole Sessions
JessThat can go in the oven for about 30 mins and they will become microwaveable and dishwasher safe, what kind of dish did they put them in? just curious
kyla
Oh wow! Thank you so much for the feature! How exciting and I’m so happy you liked them! I will for sure be returning!
kyla
Hey Jessica! So far I’ve had no issues handwashing…but it’s only been a couple weeks.
Amy
kylaHi,
I have tried to using clear finishing spray which has worked wonders! Considering that they are only marbled on the bottom no health risks should occur either (which is what I was worried about)
kyla
Thanks Bev and thanks for stopping by!
kyla
Thanks Carmen! And thanks for stopping by!
kyla
You just won the award for funniest comment EVER! We must become friends! Love your blog lady. Thanks for visiting my little space on the internets =)
kyla
Thanks Angela and thank you for stopping by!
kyla
Thank you so much for the feature!
Chloe
How easy and cool. Definitely giving this a try!
kyla
ChloeChloe, they are so easy, it’s crazy! Thanks for stopping by! If you do try it, please upload a picture to my Facebook page. I’d love to see how it turned out!
kyla
Oh Awesome! THank you so much for the feature! I’m going to go over and stop by now!
Pre
This would be really cute for mugs that are used as pencil holders – or for vases, etc! I probably would not attempt it for mugs that I actually used for food and beverage though, even if the color was not near the mouth/food area.
They would be cute if dipped, dried then dipped in a 2nd color for a layered effect, too.
kyla
Thank you so much Mindie! You are too sweet! Hope you’ve had a better week health wise! Been thinking about you!
kyla
Awesome! Thank you sooooo much for the feature Natasha! If you try it out, post a picture of it to my Facebook page! I would love to see it!
Heloisa
I was wondering, if “top coated with mod podge would this look stay safe longer?
kyla
HeloisaIt might? I’m not as familiar the mod podge. I always look at it in Michael’s…mainly because I love it’s retro looking label =) I tell ya what though, if you try it, would you let me know?
Heloisa
kylasure thing!
i will do it with only one and see what happens. 🙂
kyla
Post a picture of them to my Facebook page…I’d love to see how they turned out! Good luck and thanks for stopping by!
Nikki
Those cups look beautiful. You should totally be a hand model!! 🙂
kyla
NikkiHa! It’s funny you say that Nikki! My mom was a hand model for Avon back in the 70s!
kyla
Awesome! So glad you stopped by! Be sure to upload a picture of yours to my Facebook account. I always love to see how everyone’s projects turn out!
kyla
Oh awesome! Thanks for stopping by Charlotte!
MsLove
I saw these and had to give it a try. I wanted to ask you about how they’re holding up these days? Also, do you have any issues with the paint when you put hot liquids in the mugs?
kyla
MsLoveMine are holding up well! I don’t use them as much for drinking anymore though. I hand washed them a few times which is my least favorite thing to do, so they became pencil holders! LOL! But they look really pretty on my desk, and I can enjoy them every day. How did yours turn out?
Yasmin
Here’s a tip; line your container with glad wrap first s you don’t have to worry about getting nail polish on it! This is a good tutorial. I tried one from another website which says to drip the polish from the applicator, and you end up with splodgy polka dots. NOT the look I was going for!
kyla
YasminThat’s a really great tip! Thanks for chiming in! And I’m so happy it was a good tutorial for you. Splodgy polka dots is no good!
sarah
Please advise if you could do this using terracotta plant pots or on glass??
Thank you.
S x
kyla
sarahHi Sarah! I’ve only done it on these mugs, but I have seen it on glass and it’s gorgeous. Especially in a hot pink. The terra cotta I’m unsure of, but if you try it, let me know. I’d love to hear how it turns out!
sarah
Thank you for your reply!! I will let you know my findings!! X
kyla
sarahAwesome! I can’t wait to hear. Good luck!
alex
Hi there, my daughter and I did this recently and are really pleased with the results. Unfortunately we now can’t get rid of the smell of nail polish on the mugs which makes using them rather unpleasant. Can anyone suggest a fix for this problem please x
kyla
alexHi Alex, I’m so sorry you are having that problem. Oddly, mine do not smell. Maybe it’s the polish? When you paint your nails with it, does the smell stick around?
alex
kylaNot sure as I rarely paint my nails, I’ll do so now, if it still smells I’ll take it of the mugs and start over with different polish.
kyla
Oh you should! They are so fun to do!
kyla
Thanks so much for stopping by Trish!
kyla
Ha! Sometimes…other times, not so much =) Thanks for stopping by Meredith.
kyla
This is so awesome! Thank you! =)
kyla
Awesome! Thank you soooo much!
Chloe
i’m going to try this for my christmas presents!!! Quite excited to see the results:)) yours looks so pretty!
kyla
ChloeOh do it! They are so easy! If you do, Instagram them and tag #HOHinMyHome I’d love to see them!
Chloe
I tried to water marble my mugs but it’s not working:( is it possible to water marble clear, transparent mugs?
malissa
Has anyone found the polish gets flaky…does baking it help with this, or putting a gloss finish on it?
V
Does it benefit to add dishwasher safe mod podge? any advice would be greatly appreciated 🙂
Lori- fellow INFP
is it safe to microwave these??? I want to give some of them as gifts, but I’d like to know if this is hazardous at all…
Salwa
Can i know the material or quality of the mug??
Reno Peterson
I’m guessing this technique could be used for most ceramic/porcelain items? Possibly cabinet knobs and ceramic drawer pulls?
kyla
Reno PetersonYes! Definitely! After I did the mugs, I swear I wanted to marble everything in my house.
15 Cute Marble Crafts
[…] House of Hipsters shows you how to marble the surface of mugs and other kitchen porcelain using nail polish and water! You’d be surprised how easy this technique is, even though the final product is totally gorgeous. […]
Lizzy
Can I do this with glass paint or enamel craft paint instead of varnish?
mackenzie
Hello, I was wondering–is there any way to seal the mug so it’s dishwasher safe?
kyla
mackenzieHi Mackenzie. I’ve never tried to seal them.
Ava Porter
I love this, I was wondering, when you set them down to dry do you put them so the open end is facing up or down (against the paper towel)
kyla
Ava PorterI laid mine face down on paper towel =)
Heather
I haven’t tried this yet, but i came across a few tutorials that suggested either dish-washer safe mod podge or a clear acrylic sealant to seal in the nail polish…though both also said not to put sealant or mod podge near spot you would drink from. Hope that helps. I can’t wait to try this..going to the thrift shop toda to find some white mugs!
Bhin
doesnt it wear offand is it safe to drink from? one other thing, How do I clean the mug?
Razbregrll aka Katie
This was easy great amd cheap!. It literally rook me less than five minutes to find the things needed and complete a piece. Amazing idea! Ps. You dont to stick to just mugs!
Razbregrll aka Katie
Razbregrll aka KatieAlso fyi . . Quick dry nail polish appears to sink right to the bottom, howwever i stir it ( i used chop sticks) it added a tint of the color that sank in a more watercolor wash way. Was pretty cool against the marble design of the polish that did float and create a film.
kyla
Razbregrll aka KatieIt’s so fast and easy! Glad you had fun with it too!
Adrienne
Those are very pretty! I am going to make them for my grandma and aunt on Christmas!
Ally
How well does the paint hold up? Does it stay over several uses and washes?
MOLLY dubbs
That’s really cool, but I have a question…. can you use a pre-colored mug? If it is a light color, i would think it would be fine, the design just wouldn’t show up AS well. But I don’t have access to a white mug, sooo……. BTW SRRY BOUT UR COLD LOL
sara
amazing, what a cool effect
Donna
We were given the supplies with a craft class and they included 2 metallic and 2 other nail gels. Do the gels take longer to dry? It’s been a week and they are still sticky.
Kyla Herbes
DonnaI’ve never done this with gel nail polish, but my guess is that’s the inhibition layer and needs to be wiped with isopropyl alcohol wipes or a lint free cotton pad. The alcohol should dissolve the sticky layer (which is uncured gel polish) making it easy to wipe away. But again, I’m taking a guess.
R
I love how they turned out…would recommend get an extra just in case one doesn’t turn out or you don’t like it.
Kyla Herbes
RWhole heartedly agree ❤️
Hannah
They are so very cute! Thank you for the idea!! I’m going to use this for my friend this Christmas. ❤
Kyla Herbes
HannahYour friend will love it! Have fun!